If you use Microsoft Excel for anything more serious than a shopping list — financial models, sales dashboards, pipeline trackers, messy data exports from your CRM — you already know the two things that eat most of your day: understanding what the data is telling you and doing repetitive work to the data itself. Both are now things Claude can do for you, without ever leaving the workbook.
Anthropic's Claude for Excel add-in puts the same AI model you use on claude.ai into a side panel inside Microsoft Excel. It reads your cells, understands your formulas, answers questions about your data, and — when you approve it — writes back into the sheet as an agent. You don't need a plugin marketplace, a macro, or a single line of VBA. You just need a Claude account and about three minutes to install it.
This is the complete, no-fluff guide to installing the Claude AI add-in in Excel and using it for the two use cases that matter most to professionals: explaining your data and acting as an agent inside your spreadsheet. Every step has an annotated screenshot. By the end, you'll be independent.
Analysts, consultants, operations managers, finance professionals, founders, and anyone who lives in Excel and wants an AI assistant that can actually read the workbook, reason about it, and take action — not just generate formulas you still have to paste yourself.
What you need before you start
The Claude add-in for Excel is free to install, but it needs two things to run: a recent version of Excel and a Claude account.
- Microsoft Excel — Excel 2016 or later on Mac or Windows, or Excel on the web. Microsoft 365 subscribers are all set.
- A Claude account — the free tier works to try it out, but for serious daily use on larger workbooks you'll want Claude Pro ($20/month) or a Team/Enterprise plan. Higher plans give you larger context windows, which matters when Claude needs to read thousands of rows at once.
- About 3 minutes — the install flow is a one-time authorization, not a download.
Part 1 — How to install Claude in Excel, step by step
The whole install is a one-time OAuth handshake between Microsoft Office and your Claude account. You'll do it once per machine and never think about it again. Here's the exact flow.
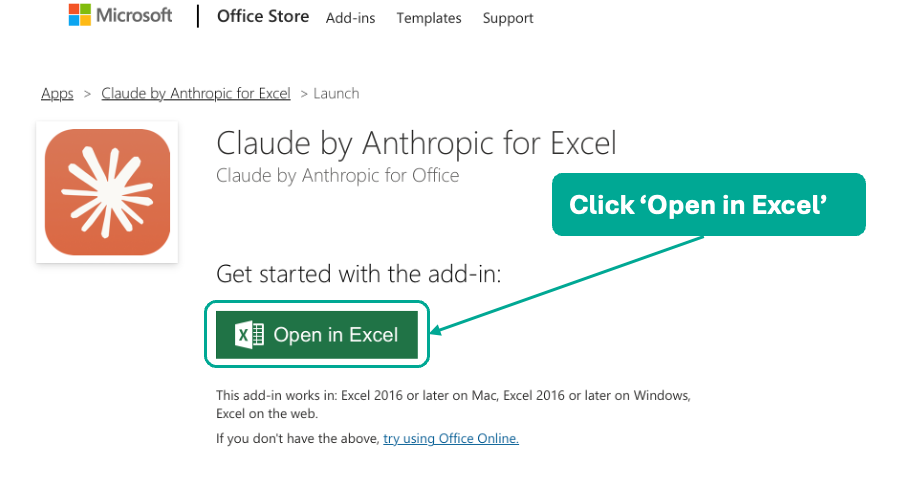
Open the Claude for Excel listing on the Microsoft Office Store
Go to pages.store.office.com and search for "Claude by Anthropic for Excel", or use the direct link from Anthropic's documentation. On the product page, click the green Open in Excel button. This launches Excel and loads the add-in automatically — you don't download an installer.
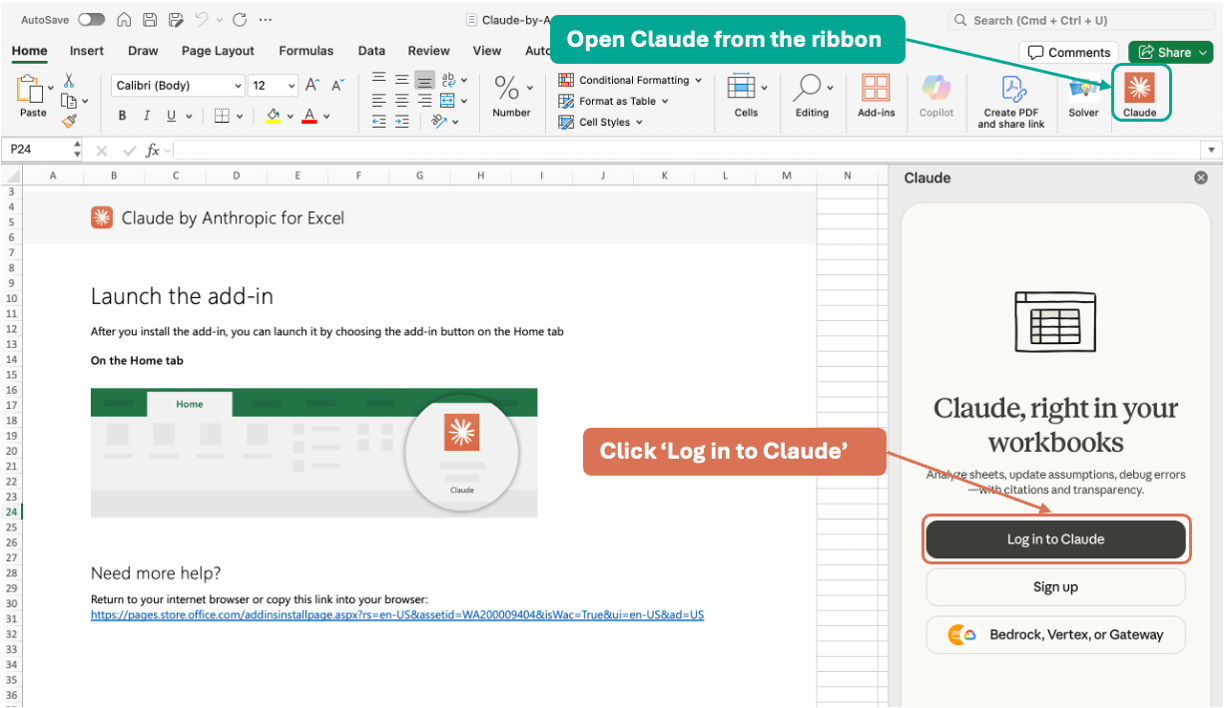
Open the Claude side panel from the Excel ribbon
Once Excel opens, you'll see a new Claude button at the far right of the Home ribbon (next to Solver and Create PDF). Click it to open the Claude side panel. In the panel, click Log in to Claude.
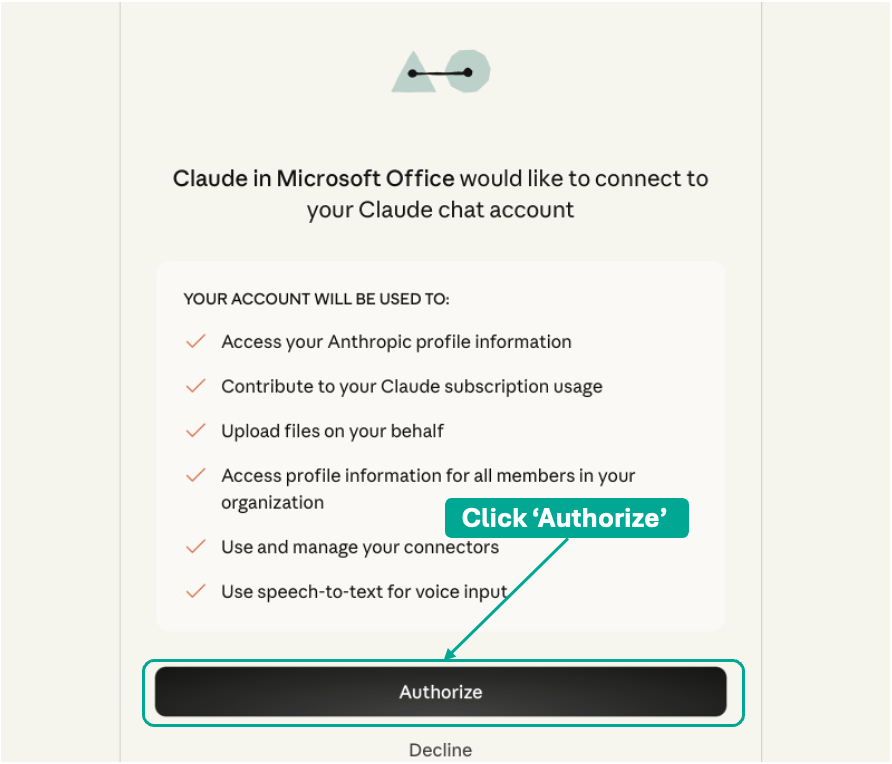
Authorize Claude to connect to your account
Excel will open a browser window at claude.ai showing a permissions screen: "Claude in Microsoft Office would like to connect to your Claude chat account." Review the permissions (profile info, subscription usage, file uploads on your behalf, connector access) and click Authorize.
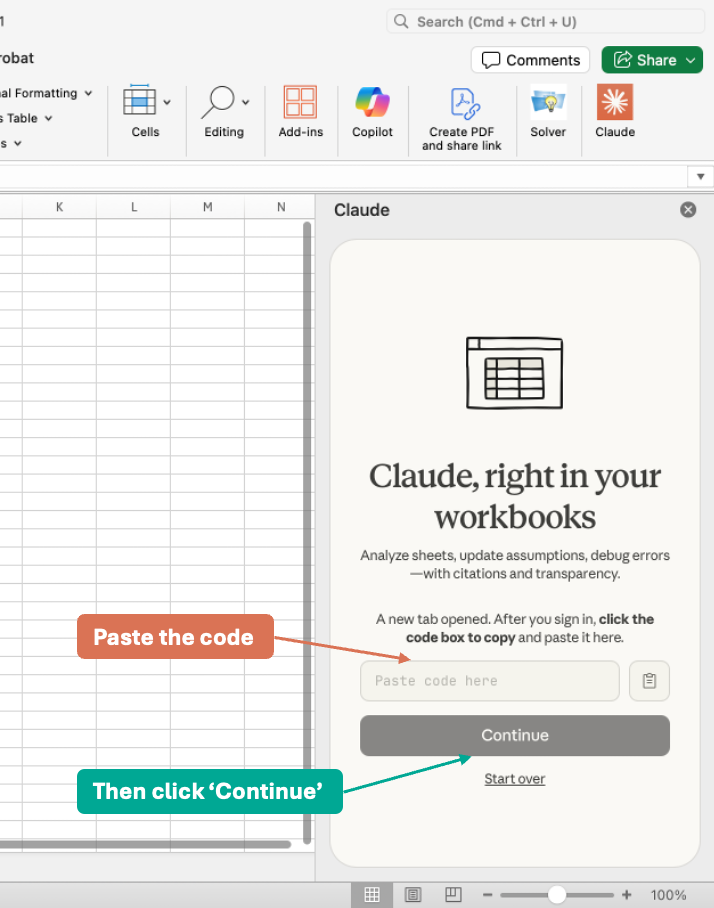
Copy the pairing code back to Excel
After you authorize, claude.ai generates a short pairing code and automatically copies it to your clipboard. Switch back to Excel — the Claude side panel is waiting with a Paste code here field. Paste the code and click Continue.
That's the install complete. Open any .xlsx file, select a cell, type a question in the Claude side panel, and Claude will read the surrounding data to answer. The side panel follows you as you move between sheets, keeping full context on whichever tab you're on.
If you ever lose the Claude button from the ribbon, go to Insert → My Add-ins in Excel and re-enable "Claude by Anthropic for Excel". Your authentication persists — you won't have to log in again.
The two ways professionals actually use Claude in Excel
Once Claude is installed, there are a hundred things you could do with it. But in practice, every useful workflow falls into one of two buckets, and it's worth being intentional about which one you're in when you prompt:
- Use case A — Explaining the data. Claude reads your sheet and tells you something you didn't know: a trend, an anomaly, a KPI, a driver, a summary. It does not touch the workbook. You stay in control; Claude is your analyst.
- Use case B — Acting as an agent inside Excel. Claude reads your sheet and then changes the sheet for you: cleaning data, adding columns, writing formulas, restructuring tables, fixing inconsistencies. Every write is gated by an approval dialog, so nothing happens without your click.
Being explicit about which mode you want — analysis or action — is the single biggest thing that separates "I prompted Claude and it was OK" from "I prompted Claude and it saved me an hour." The rest of this article walks through a real example of each.
Part 2A — Use Claude to explain your data
This is the mode most people start with, and it's the one I reach for dozens of times a day. The workflow is simple: select your data, ask a plain-English question, read Claude's answer. Claude reads the cells you've selected (and the surrounding named ranges and headers it can see), reasons about them, and returns a structured answer with clickable cell references — click a reference in Claude's response and Excel jumps to that cell.
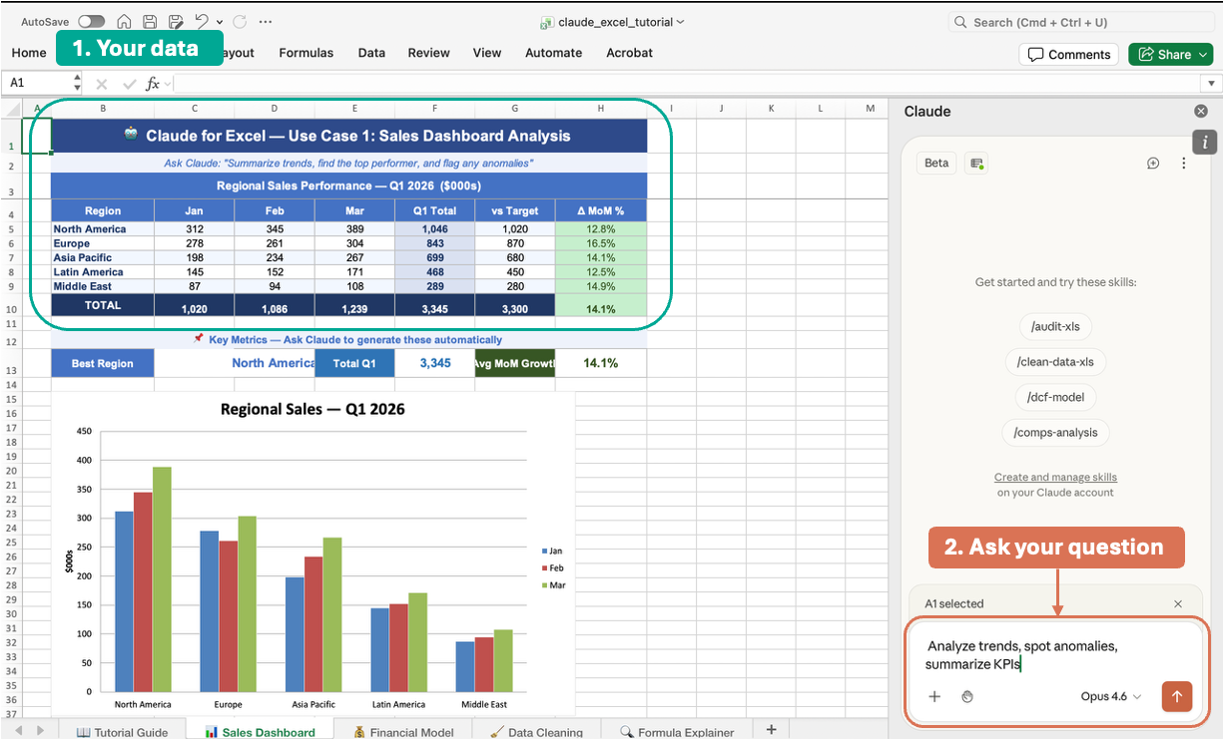
For this walkthrough I'll use a sales dashboard I was working on. The sheet contains a regional sales performance table for Q1 2026 — five regions, three months, plus a target and a month-over-month growth column — and a bar chart of regional revenue. It's the kind of table every sales operations person has seen a thousand times.
The data and the question
My goal was to get the kind of summary I would normally ask a junior analyst for: what's the headline, where did we beat target, where did we miss, and what should I be worried about. I selected the sales table, opened the Claude side panel, and typed a single prompt:
What Claude returned
Within a few seconds Claude produced a structured KPI Summary: total Q1 revenue, performance against target, best-performing region, average month-over-month growth, and the region with the strongest momentum. Every number was hyperlinked back to the exact cells it came from. Click $3,345K in Claude's answer and Excel jumps to the cell in the Total row. That alone is worth the install — it turns every insight into an auditable trail.
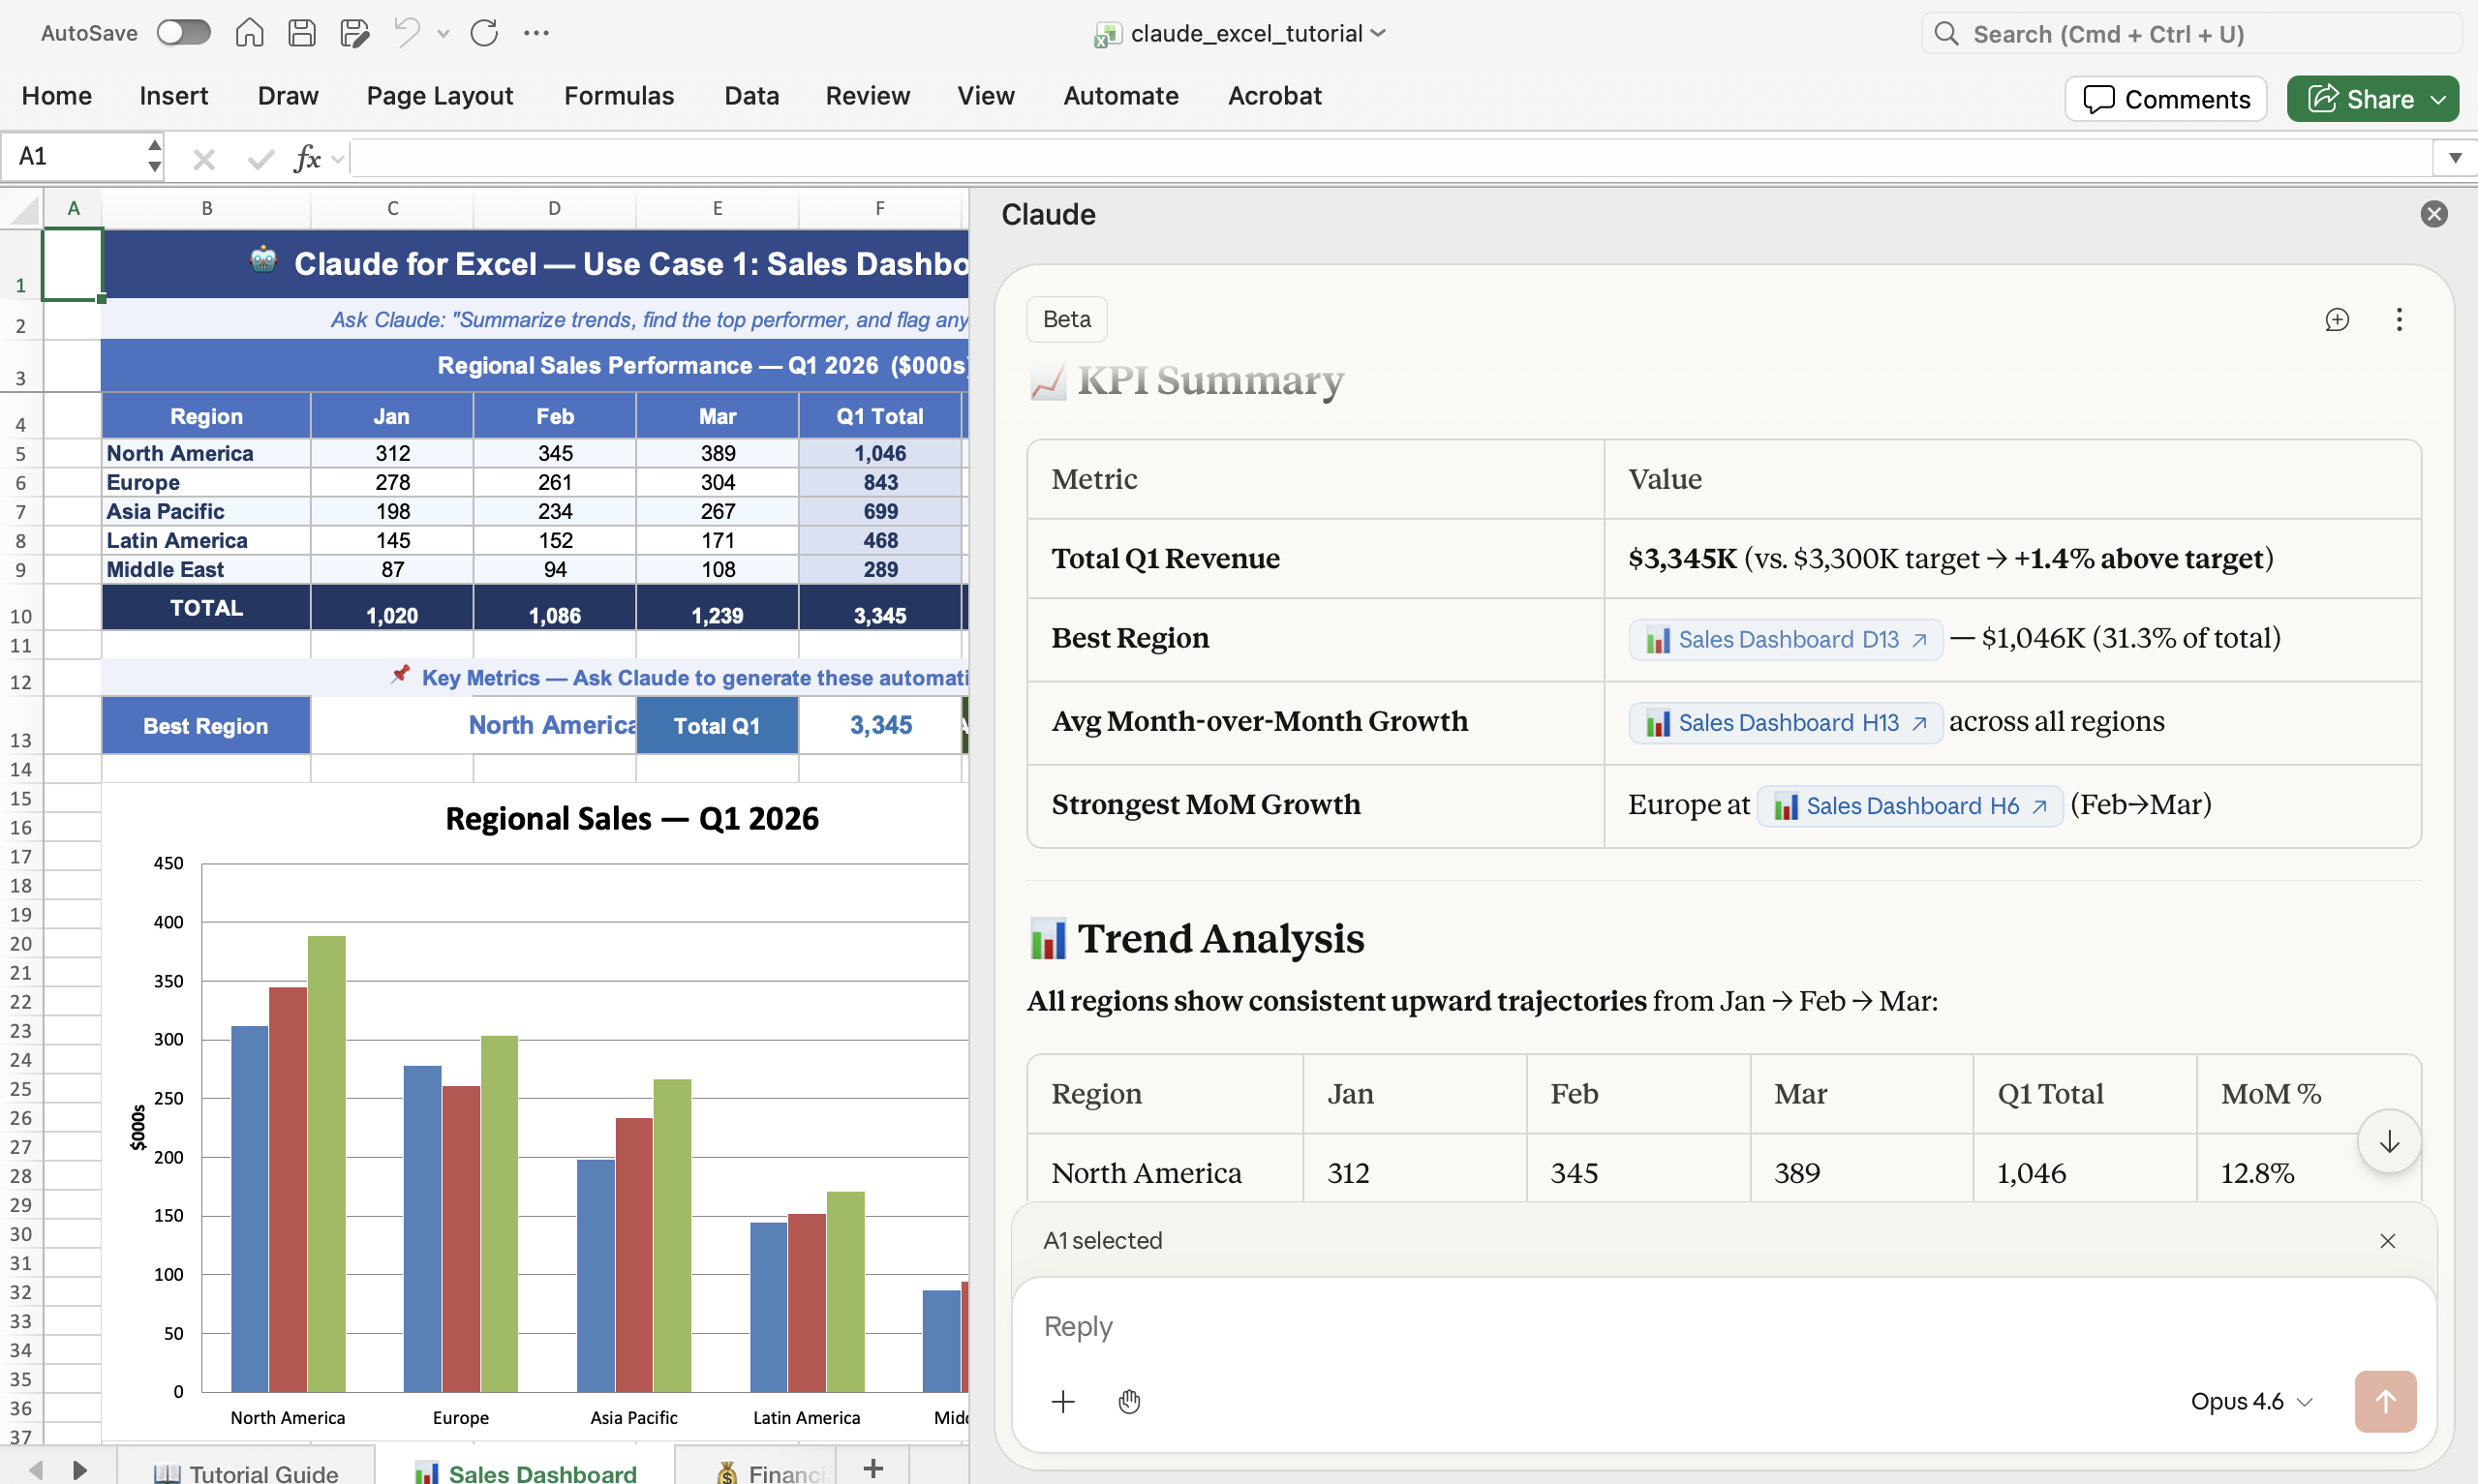
The part you actually care about
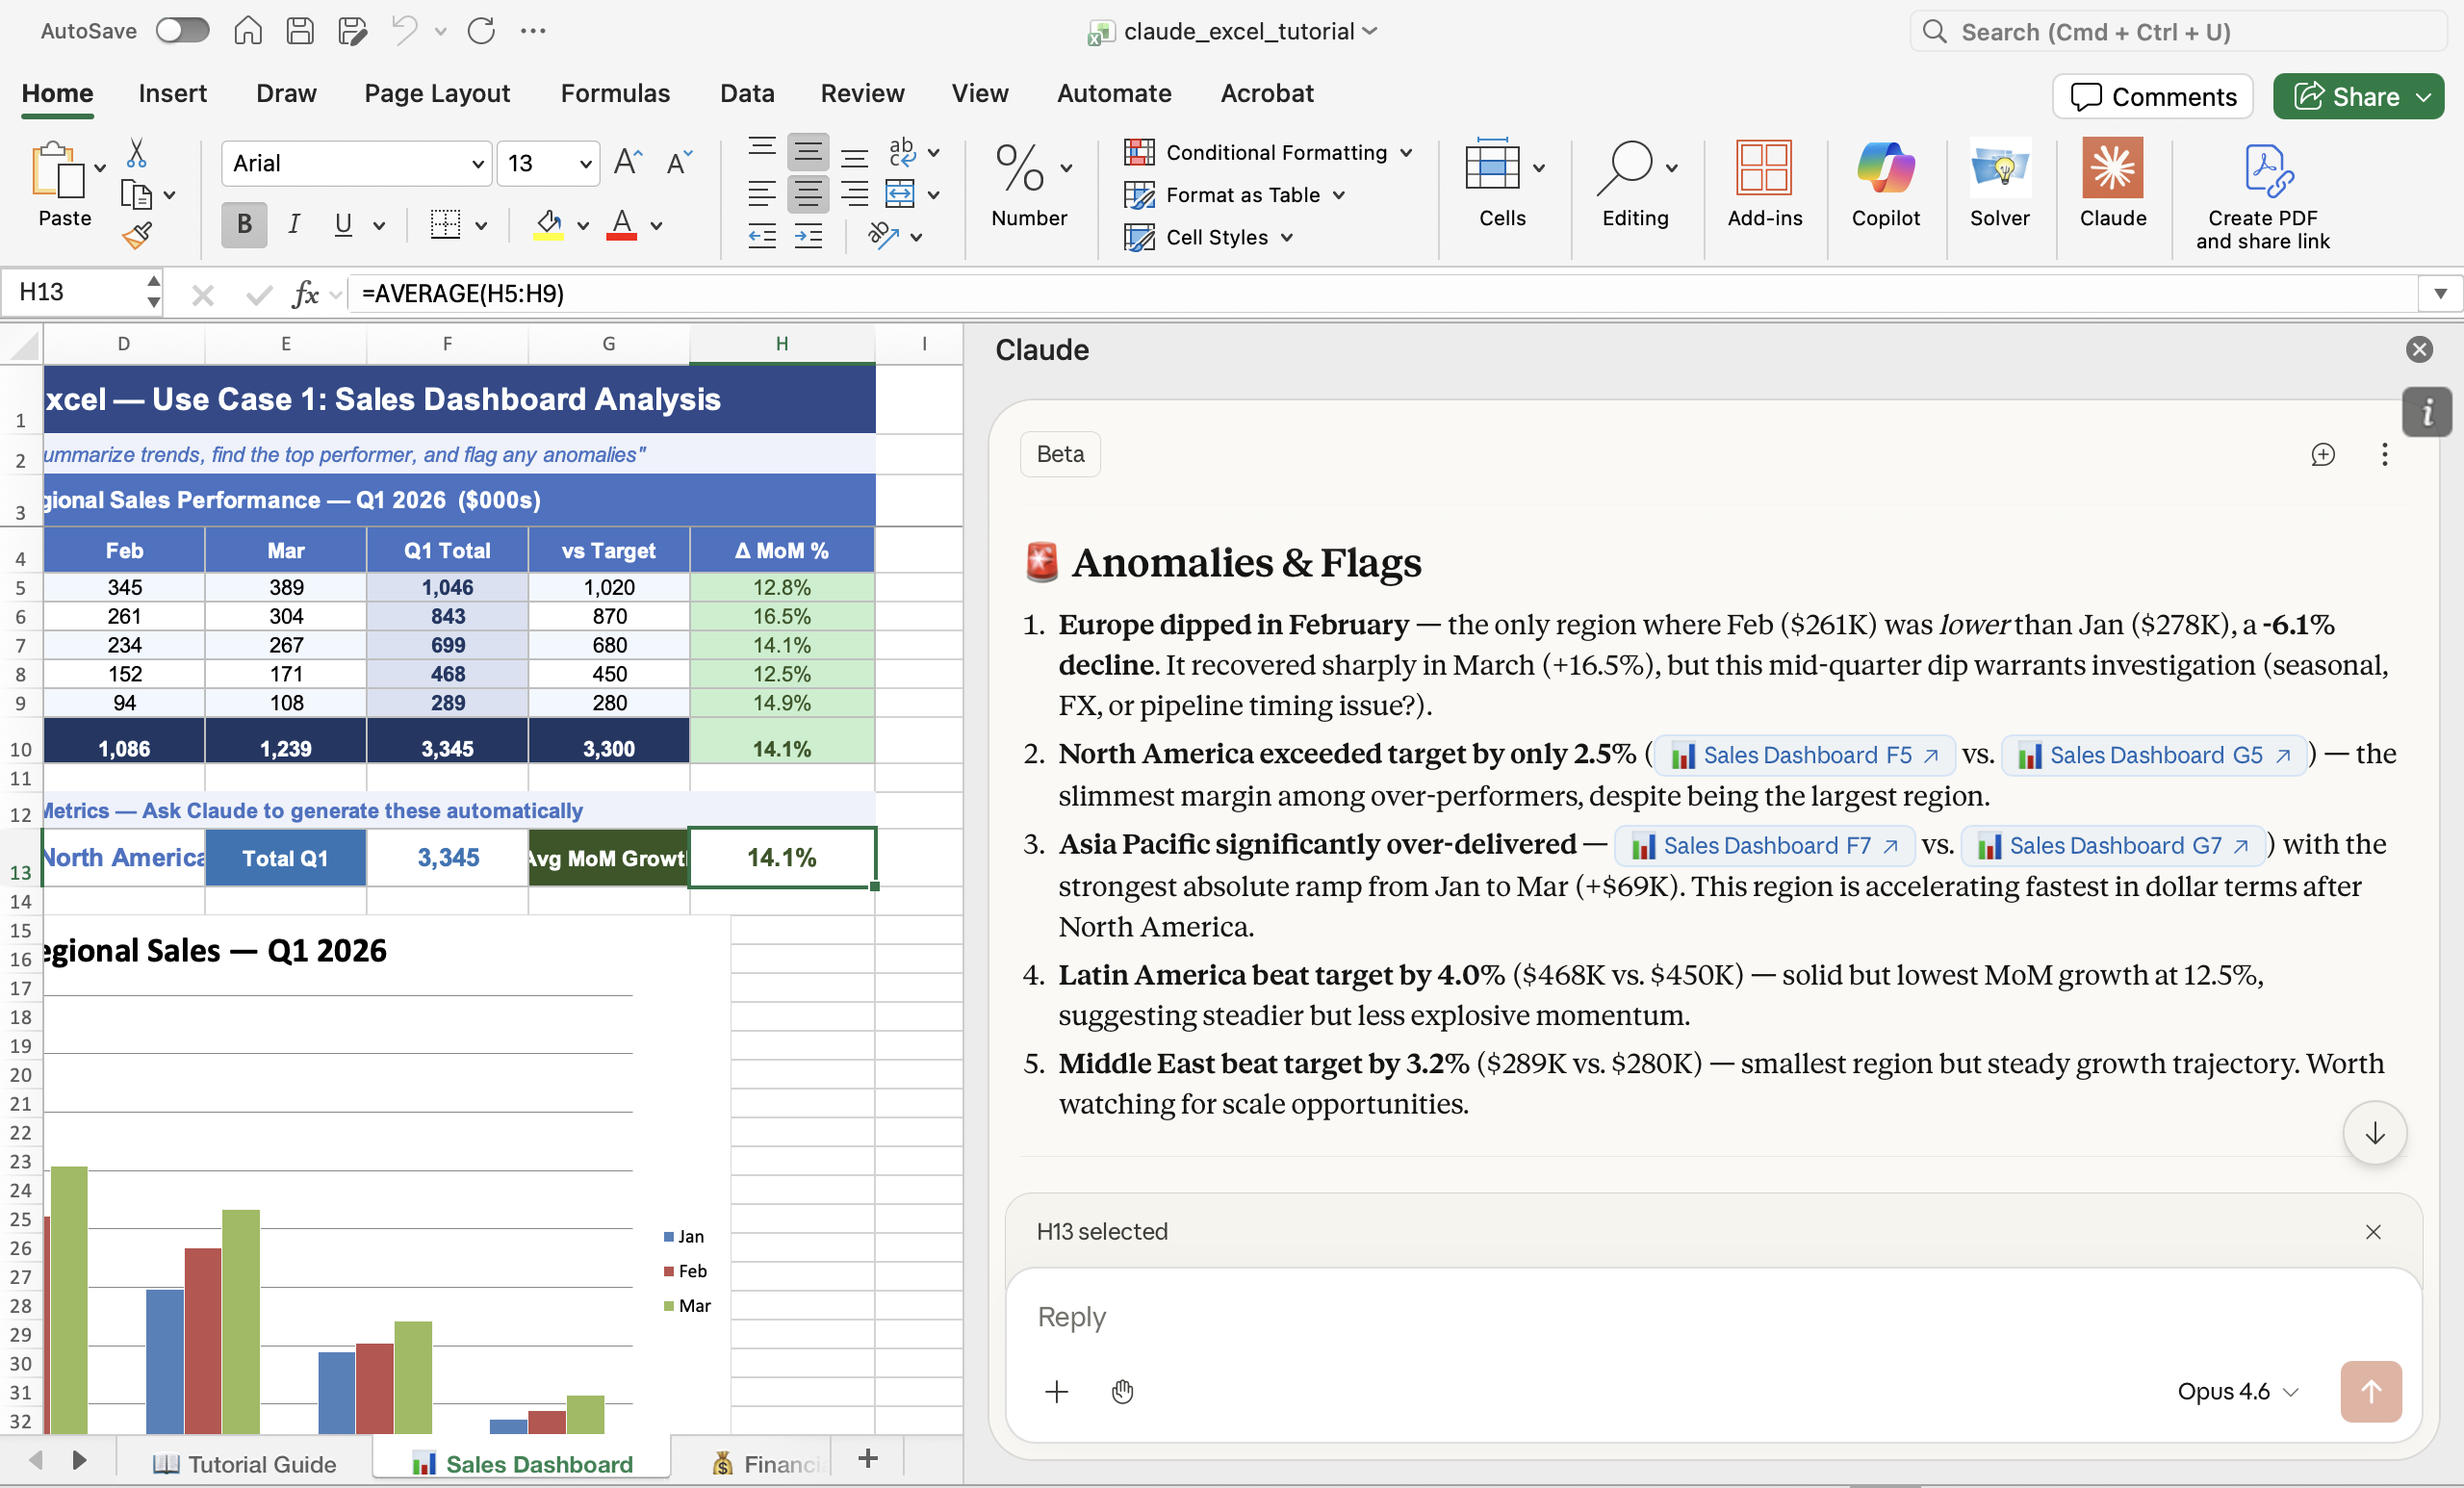
Below the KPI summary, Claude continued with an Anomalies & Flags section — the genuinely useful part. It called out Europe's February dip (down 6.1% month-over-month), noted that North America only narrowly beat target (up 2.5%), and flagged Asia Pacific as significantly over-delivering. It even suggested follow-up questions: "Should we investigate the Europe dip? Is this seasonal, pipeline, or FX?"
A pivot table, a SUMIFS or two, a chart, and 15 minutes of eyeballing. For explanatory analysis, Claude in Excel collapses the "describe the numbers" step of every report into a single prompt.
Part 2B — Use Claude as an agent inside Excel
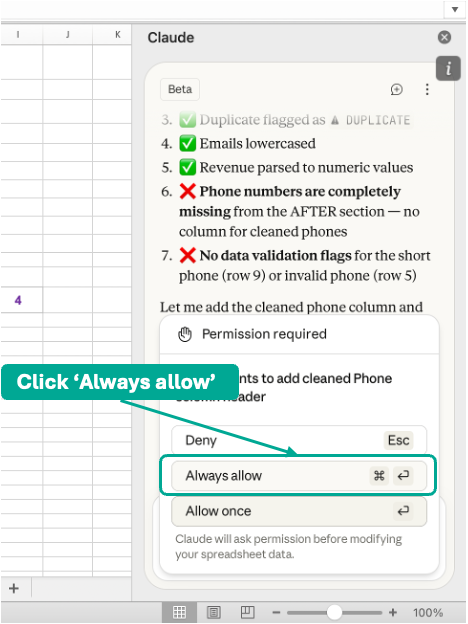
This is the mode that surprises people. Up to this point Claude was purely a reader. In agent mode, Claude can also write into the workbook — add columns, fix values, reformat cells, insert formulas, standardize fields — but only after it asks you for permission. Every write operation pops a small Permission required dialog in the side panel with three options: Deny, Always allow, or Allow once. Nothing happens without your approval.
The example I'll walk through is the one use case everyone who works with CRM or signup exports recognizes on sight: data cleaning.
The data and the problem
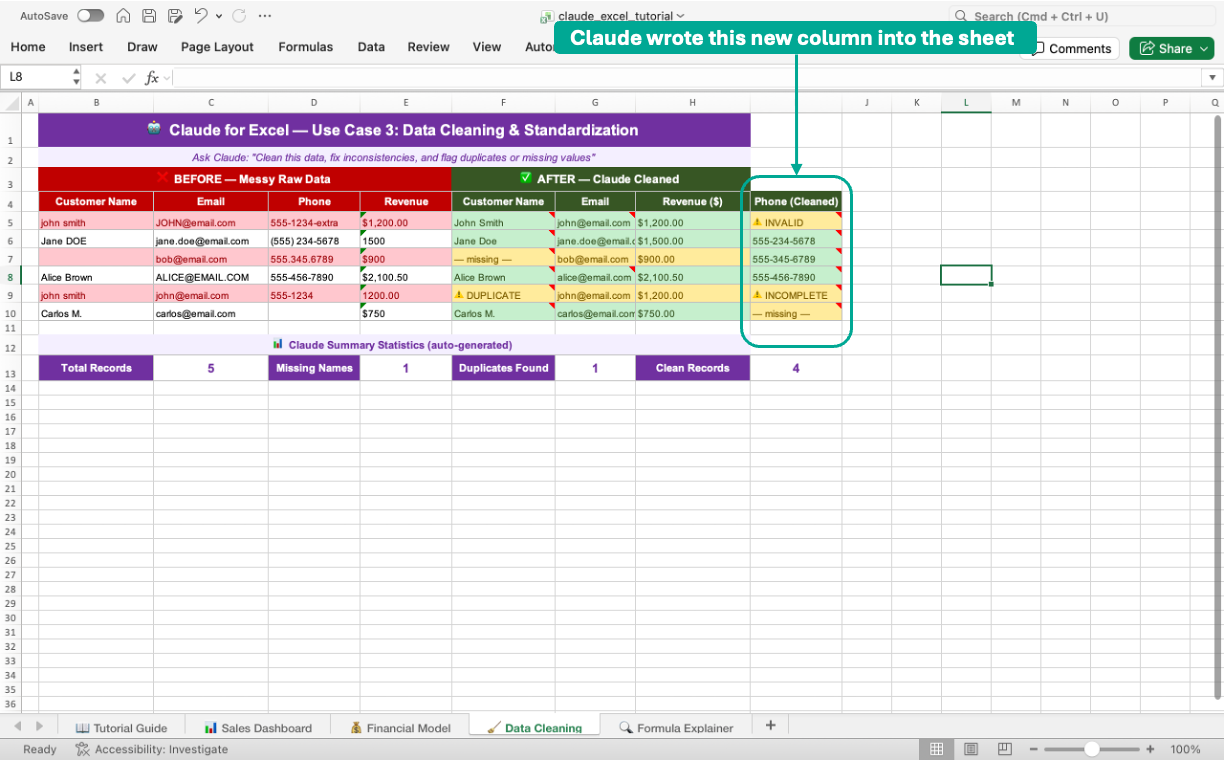
For this walkthrough I used a raw customer export I had sitting in a workbook — the usual classic problems: inconsistent name capitalization ("john smith", "Jane DOE", "Alice Brown"), phone numbers in mixed formats, a missing revenue value, duplicate emails, and one blank row. I set up the sheet as two tables side by side: BEFORE — Messy Raw Data on the left, and an intentionally empty AFTER — Claude Cleaned on the right. The goal was to get Claude to populate the AFTER columns from scratch.
My prompt was intentionally minimal — I wanted to see how much Claude could figure out on its own:
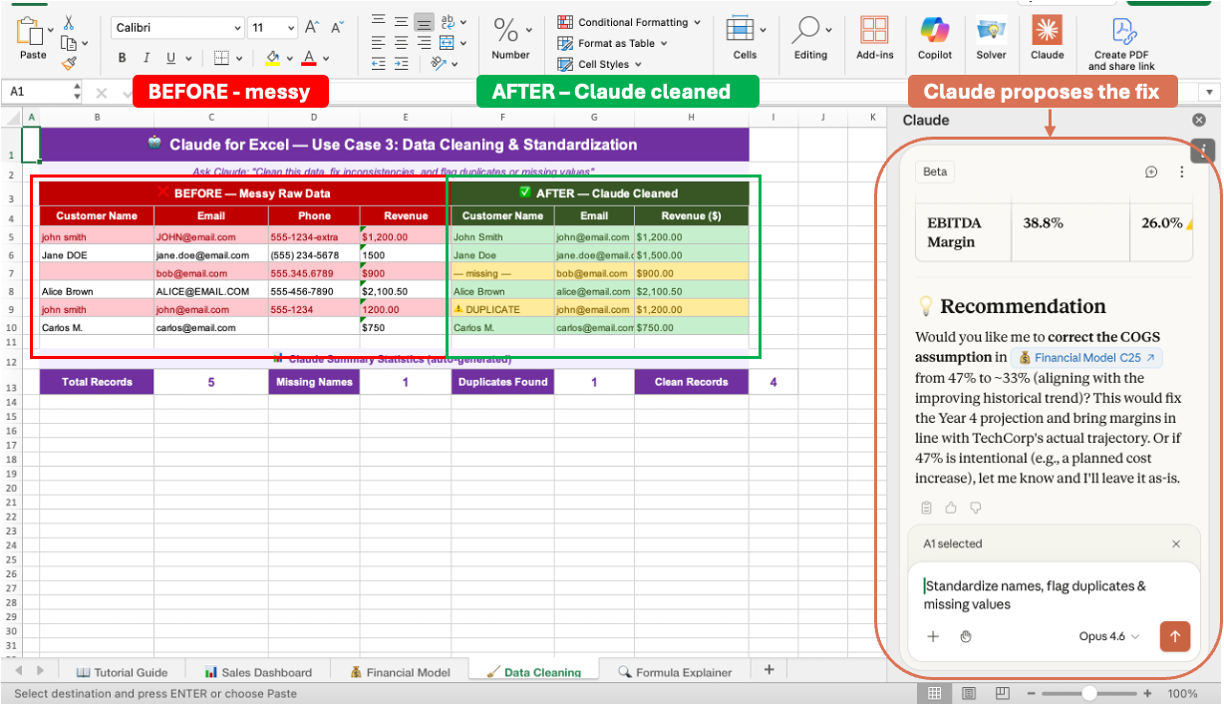
Claude proposes the fix — you approve it
Instead of just editing, Claude first returned a numbered plan: "I'll lowercase emails, title-case names, standardize phone numbers, parse revenue as numeric, and flag rows 3 and 5 as missing/invalid. I also need to add a new Phone (Cleaned) column — may I add it?" — followed by a Permission required dialog. I clicked Always allow for this sheet, and from that point forward Claude could apply the rest of the transformations without stopping.
Claude writes the cleaned data back into the sheet
Claude then populated the AFTER columns, added a new Phone (Cleaned) column to flag invalid numbers with statuses like INVALID and INCOMPLETE, and updated the summary row at the bottom (Total Records, Missing Names, Duplicates Found, Clean Records). The entire cleanup took about 20 seconds and — crucially — every change was made in the workbook itself, not in a separate chat window. I could undo any of it with Ctrl/Cmd + Z just like any other Excel edit.
A regex in Power Query, a TRIM/PROPER stack, a VLOOKUP to flag duplicates, a column of IF statements for validation, and a lot of manual re-typing. For data cleaning specifically, Claude as an in-sheet agent is the closest thing Excel has ever had to a "just fix this" button.
Tips to get more out of Claude in Excel
A few things I've learned from daily use that aren't obvious from the documentation:
- Select before you prompt. Claude reads your current selection first, then the surrounding table. If you want it to reason about a specific range, select that range before you ask. If you want it to reason about a whole sheet, click one cell and say "consider the whole sheet."
- Tell Claude which mode you want. Start prompts with "Explain…" or "Summarize…" for analysis mode, and "Add a column…", "Clean…", "Fix…", or "Standardize…" for agent mode. The verb disambiguates intent.
- Use clickable cell references as an audit trail. When Claude reports a number, click it. If the source cell isn't what you expected, your prompt was ambiguous — rephrase and re-run.
- Approve once, then batch. On long cleaning or restructuring tasks, click Always allow on the first permission dialog so Claude doesn't interrupt itself mid-flow. You can revoke permissions any time from the panel menu.
- Claude respects your formatting. If a column is formatted as currency or a date, Claude's writes respect it. This matters more than it sounds when you're dealing with financial models.
- Keep prompts short for analysis, explicit for actions. "Summarize KPIs" is enough for analysis. For agent work, spell out the destination: "Write the cleaned names into column G starting at row 4."
The limits worth knowing about
Claude in Excel is genuinely useful today, but it isn't magic. A few honest limits:
- Large workbooks. Very large sheets (tens of thousands of rows, many tabs) can exceed the context Claude can read in one pass. Work on a selection or a single tab at a time.
- Complex multi-sheet models. Claude handles cross-sheet references well, but for deeply nested financial models you may still need to walk it through the structure in the first prompt.
- It's not a replacement for Power Query. For repeatable ETL that you run every month on the same file, a real Power Query pipeline is still the right tool. Claude shines on one-off cleaning, explanation, and restructuring.
- Review before you ship. Claude is a coworker, not a compliance tool. For anything that goes to a client, the board, or the regulator, review its writes before you save.
Frequently asked questions
Is the Claude Excel add-in free?
The add-in itself is free. You need a Claude account to use it — the free tier works for light usage, but Pro ($20/month) or Team is recommended for daily professional work because of the larger context window and higher message limits.
Does Claude in Excel work on Mac?
Yes. It works on Excel 2016+ on both macOS and Windows, and on Excel on the web. The install flow is identical.
Can Claude see my entire workbook or only my selection?
Claude prioritizes your current selection and the named ranges/tables it touches, then expands outward as needed. You can explicitly tell it to "consider the whole sheet" or "only look at cells A1:G50."
Does Claude modify my sheet automatically?
No. Every write operation requires your explicit approval via a permission dialog. You can approve a single action, approve all actions for the current task, or deny.
What happens to my data?
The cells Claude reads are sent to Anthropic's model to answer your prompt, under the terms of your Claude account. Review Anthropic's privacy documentation for the specifics of data handling and retention for your plan.
Can I use Claude in Excel for financial models?
Yes, and formula auditing is one of its best use cases. Ask Claude to "explain this formula in plain English", or "audit this sheet for formula inconsistencies", and it will walk through the logic cell by cell.
The bottom line
For the first time, Excel has a genuinely useful AI collaborator built into the workbook itself — not a chat window in a browser tab you paste screenshots into, not a Copilot that generates formulas you still have to apply yourself, but an add-in that reads your cells, explains what they mean, and edits the sheet for you when you ask it to. The two modes — analyst and agent — cover the overwhelming majority of work most people do in spreadsheets. Installation takes three minutes. The productivity gain starts on the first prompt.
If you run an operations, finance, or analytics function and you haven't installed it yet, there's no reason to wait. And if you want help turning this into a real workflow for your team — standard prompts, approved use cases, a training rollout — that's exactly the kind of thing we do at GehanTech.